Wednesday 28 August 2013

Laura Loves ...

Penneys false nails !


Oh my God I absolutely love these glue on false nails!!!

I complimented my brothers Girlfriend's gorgeous nails at a BBQ at the beginning of summer assuming they were shellac or gel nails that cost a bomb but when she told me they were from Penneys and that they are only €1.50 a pop I nearly fell off my chair. 

I literally went in the next day and picked up a set with bows on them and a set of luminous coral ones. A few weeks after I picked up a blush pink set, a lime set and these moustachioed babies! Recently I've seen burgundy and red studded ones. 

I put the bow set on before my holiday to Portugal in June and I was so impressed that they lasted the full week even though I was in and out of the pool and using loads of oily suncream and exfoliators. Since then I've been hooked!!! But, if your nails are weak unfortunately I'd advise you to stay away from them, the glue makes your nails really soft and brittle. Even people with strong nails should wait a few weeks in between applications to allow your own nails to regain strength. I found the overall quality of these false nails good, the nails don't snap and the colour doesn't fade but some come jagged around the edges however these imperfections can be easily filed off using a nail file. 

With the bargain price, the massive selection, the longevity and the acceptable quality these nails definitely get the "Laura Loves" seal of approval !!! I want a pair in every colour!

Below is a quick tutorial on how to apply the nails. 


1. Cut your nails down short
2. Remove all traces of nail varnish from your nails
3. File away any jagged edges 
4. Using a cuticle remover, remove any overgrown cuticles 


5. From the pack of 24 select out what size false nail fits every finger, I recommend laying them out in order so you don't get mixed up and apply the wrong false nail to the wrong finger!
6. Apply a thin layer of glue onto your first nail and place the false nail down as near to your cuticle as possible (but not on your cuticle) press it down on your nail for about 5 seconds
7. Repeat on all your other nails
8. File the false nails into the shape and length that suits you and Voila gorgeous nails in no time!


I hope you all enjoyed my Penneys false nails review and tutorial,
Thanks for reading,

Love Laura xox


Saturday 24 August 2013

Shutterbug Vintage Kilo Sale & Folkster Pop-Up Shop


Sequins, chiffon, suede, fur, leather, denim, sholder pads, peplum, mini, maxi, midi... am I in heaven?

After work on Saturday I attented the shutterbug vintage kilo sale and folkster pop up shop event in Moxie Studios, Lad Lane, off Baggot Street. As I got off the bus I could see the droves of people emerging from Lad Lane with stuffed bags and happy faces. I got butterflies in my tummy, feeling like I was on a treasue hunt as I followed the cute direction signs through the lanes. Outside the venue was a hive of excitement, music emerging from the venue, trailers selling food and beverages and what a buzz!

I was taken away by the grand scale of the building, it was a huge warehouse filled wall to wall with rails of vintage clothes. WOW. I took off searching through the rails finding three gorgeous vintage midi skirts. The best thing about the event was all the clothes were weighed and charged by the kilo (for example, for €20 you could pick up, 3-6 lighter items, 2-3 medium weight items or 1 heavy item). My three skirts cost me a grand total of just €14. What a steal!! I had hoped to find a lot more pieces but I put this down to my late arrival, so next time it's on I'm going to take the day off work and queue early.  

The Folkster pop-up shop was fantastic; jewellery, floral crowns, turbans, fedoras, bowlers, swimsuits, handbags, clothes and Jeffrey Campbell's, to name just a few! But I was seriously disappointed when I found out all of the fedoras and floppy hats were sold out, they posted the picture of the hats (above) on their Facebook page prior to the event and I was determined to get my hands on one but by the time I made it there after work they were all sold out :( I was devastated but I made up for my loss by getting a necklace, a floral crown, a bracelet and a feather ear cuff :) according to their Facebook page the hats will be available on their website soon!!!

All the items I got are pictured below. Watch out for them featuring in future OOTDs. 


I could literally go on and on about this event for ever and ever I enjoyed it so much it was so well run lots of staff, security, dj and a never ending supply of the most gorgeous vintage clothes. Hats off to the shutterbug/folkster team. Don't worry if you missed it you can visit the shutterbug store on 27 Patrick Street, Kilkenny or add them on facebook www.facebook.com/shutterbugshop or visit the folkster website www.folkster.com
Thanks for reading, I hope you enjoyed it !!!

Love Laura xox

If you have any questions or would like to know more email me at moustachemouth90@gmail.com

Monday 19 August 2013

Flowers in the Garden


Dress / Urban Outfitters (HERE) , Handbag / Mulberry Alexa
Sunglasses / Dunnes , Hair clip / Forever21 (HERE) 
Ring / ASOS , Clock necklace / present from Croatia
Bracelets / H&M (bangles)/Penny's (spiked)/Parfois (leopard heads)
 
 
Hey guys hope you all enjoyed your weekend! 

I wore this on Sunday for meeting a friend in town. Had to go to Brown Thomas to get new MAC make up, to my disgust I'm loosing my suntan already and had to go back to a paler foundation so I picked up StudioFix foundation in NC20 and LightPlus mineral powder. The girls in MAC are so helpful I love going in there. I also picked up a gorgeous kimono in SOHO in Stephens Green shopping centre. Which I might show you guys in an ootd soon.  

We went for a few cocktails  in Pygmalion on South William Street I would usually go here for Sunday drinks. €5 in and 40% off drinks, along with great music, friendly staff and generous helpings of spirits you really can't go wrong! Ended the evening with a Rays pizza slice! YUM!
 
 
Love Laura xox


Sunday 11 August 2013

Sail Away With Me -nail art tutorial


1. Remove any traces of nail varnish from your nails using a nail polish remover with a cotton pad (recommend cutex moisture guard)
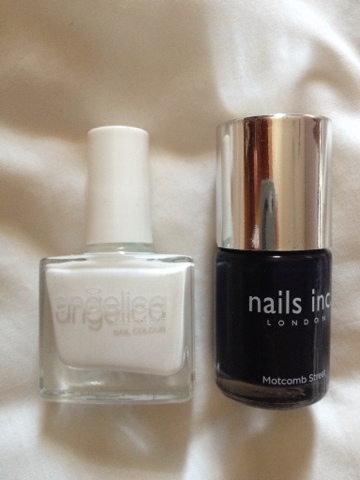
2. Paint a generous coat of white polish on every nail except the middle nail on each hand as this is where we are going to draw the anchor (I used penny's/primark's Angelica nail polish in French white tip, pictured above)
3. Apply a coat of navy nail varnish to the middle nail on each hand (I used nails inc. polish in Motcomb Street, pictured above)
4. Take a nail stripper and apply thin horizontal lines of the navy polish on every nail except the middle nail on each hand (I used the nail art brush set, pictured above, available from Topshop at €11/£7)
5. For the anchor on each middle nail, take a dotting tool and apply a dot of white nail polish below your cuticle use the nail stripper to draw a vertical line down from this and two curved lines on either side of the vertical line, draw a triangle at the end of each curved line to complete your anchor
6. Finish nails by applying a coat or two of any clear topcoat
7. Soak the top of a cotton bud in nail varnish remover and use it to remove any mistakes or overspill (I used Johnson's cotton buds, pictured above)

I recommend watching short YouTube tutorials before attempting this and remember practice makes perfect. 

Laura xox

Bloglovin

Follow my blog with Bloglovin

Into The Wild


Shirt-Forever21 / Jeans-Topshop / Shoes-Aldo / 
Necklace-H&M / Bow-Forever21 / Watch-Guess